On Twitter recently, I posted some photos of a little portable prototyping station I threw together. Henry Moore asked for some details and a parts list, so I thought I’d throw together a quick blog post about it.
Design Goals
My goals for designing this little prototyping station were:
I wanted something that could be relatively portable, so I could take it into my living room or otherwise away from my worktable.
I wanted something tailored to the kinds of stuff I build.
I wanted lots of prototyping space (I’m currently working through the book The Art of Electronics and doing some of the experiments.
As much as possible, I wanted something I could build with parts I already had on hand. This forced some of my component choices in ways you might not experience if you’re buying new stuff.
With that in mind, here’s what I came up with:
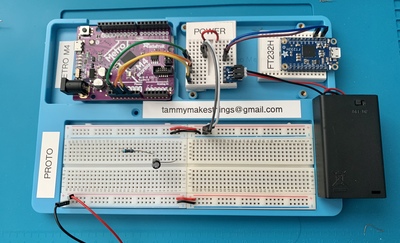
Pretty handy, huh? Let’s talk a bit about what’s onboard.
The Hardware
The base of the protoboard was something I found on Amazon (linked in the parts list below). I could have easily designed something custom fit and 3-D printed it, but I was going for speed here and my Fusion 360 and OpenSCAD skills would have made that take longer than I’d have liked.
Microcontroller
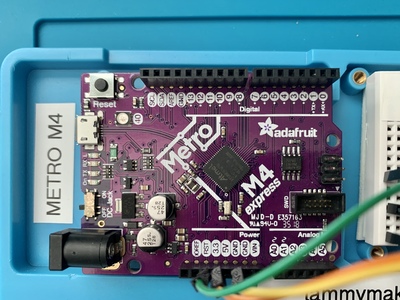
In the upper left area is a microcontroller, since I do lots of stuff with microcontrollers. (Really, who doesn’t, anymore?) I threw an Adafruit Metro M4 Express into this spot because I had it handy and it’s powerful enough to handle most all of the things I want to prototype. Like everything else on the prototyping station, it’s held on with foam double-sided tape, so I can easily swap it out for something else if I want to later.
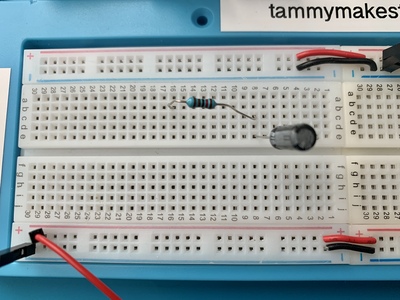
Power Distribution

The next area of the board is my power distribution block. I had a tiny little breadboard lying around, so I ran a bunch of stuff over to it:
- The 3.3VDC and 5VDC outputs from the Metro M4 Express;
- The 3.3VDC output from the I2C/SPI interface (see below);
- 4.5V DC from an Adafruit AA Battery holder (connected to the board with a JST breadboard adapter);
- Enough extra space to jumper in the output from my benchtop adjustable power supply.
This way I can jumper whatever power I want into the breadboard’s power buses, depending on what I’m working on and what’s available. (If I’m not connected to USB, the Metro M4 and the I2C interface aren’t providing power, obviously.)
I2C/SPI Interface
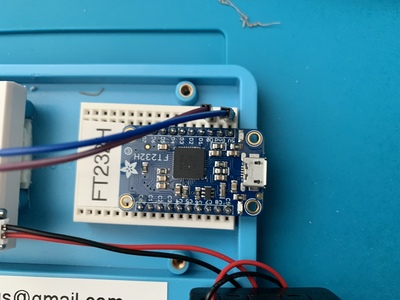
Next up is my I2C/SPI interface, so I can test sensor-based stuff and whatnot easily. I used an Adafruit FT232Hhere because it was what I had handy, but an Excamera I2Cmini or any other similar device would work here too. Again, I jumpered the power outputs of this over to the power distribution block so I could use them if wanted.
Prototyping Area
And lastly, the breadboards for prototyping space. Again, I used what I had handy. To simplify the connections between the prototyping area and the power distribution block, I’ve jumpered the positive and negative rails at the top of the breadboards together. I’ve left the bottom rails un-jumpered and unconnected to the top ones, because sometimes I run the I2C signals (SDA and SCL) or SPI signals (MISO and MOSI) along here.
Ideas For the Future
It might be nice to custom design and print a base that fits and has better mounting for all the components. Everything here is held on with double-sided tape, but designing something with the right screw holes would be nicer aesthetically.
Something else I’d probably do if I respin this is to create some more space for more breadboards. Some is good, more is better, right?
Finally, I’d like to include a couple of other things – a function generator, a small 3.3V and 5V regulated power supply, a LiPo battery and charger. None of these is essential, but they’d be useful add-ons. But then, at that point I’m basically redesigning the old Heathkit ET-3100 and it might just be easier to buy one of those and add microcontrollers.
So there you have it - my quick-and-dirty portable prototyping station. If you build your own version, let me know! I’d love to see what you come up with.
Parts List
- Base board. I used this one from Amazon, but you have lots of options here.
- Solderless breadboards. I used two of something like these and two of something like these.
- Microcontroller. Mine was the Adafruit Metro M4 Express. (I’ve linked to the current board, but mine is older and doesn’t include WiFi.)
- I2C/SPI Interface. I used the Adafruit FT232H Breakout.
- Battery Holder. I used this one, which also required a JST breadboard adapter.
- Double-sided tape. I used Scotch foam mounting tape and stacked up multiple layers of tape as needed to make everything fit.
Comments powered by Disqus.